Azure Functions via Linux Containers - A Tutorial
Donnie Hale | October 12th, 2020

Introduction
Over the last few years, serverless functions have become an important tool in the product architect’s toolbelt. Offerings such as Amazon Lambda, Azure Functions, and Cloudflare Workers allow small, focused functionality to be developed and deployed in an even simpler fashion than platform-as-a-service offerings.
I don’t believe they are (yet) a replacement for full-functionality API applications which require authorization, shared business logic, as well as other cross-cutting concerns. However, on a recent project, we wanted to use an Azure Function that a mobile application could invoke. Our challenge was that the functionality in the Azure Function required access to operating system primitives (GDI functions) which are not available in the free Azure Function app service plans.
We found a vendor recommendation and this Microsoft Azure Tutorial which pointed us in the direction of using a Linux-based Docker container as the deployment mechanism for the Azure Function. This approach:
- Meets our requirements to be able to access the operating system primitives.
- Uses the less expensive Linux Azure Function app service plans.
- Allows local developer testing to be done in a container that is effectively identical to the container that will be deployed and run on Azure.
That third point is worth explaining. As you will see in this tutorial, Microsoft provides the base container image for a Linux-based Docker container Azure Function. The Azure Function runtime is part of that base image. While the rest of the supporting Azure cloud environment doesn’t exist locally, the runtime is the same. Thus, local testing provides a greater degree of confidence that the function will perform identically when deployed to Azure.
For this tutorial, we’ll develop an HTTP-trigger based Azure Function and storage queue-triggered Azure Function. We’ll develop and run them locally using the Azure Function CLI tools. Then we’ll run and test them locally in a Docker container. And then we’ll deploy them as Docker containers to Azure.
Tools Used in this Tutorial:
- Azure Function CLI Tools
- Docker Desktop
- Azure CLI Tools
- Azure Storage Emulator
- Azure Storage Explorer
The Parts of this Tutorial:
- Create a Local HTTP Trigger-based Azure Function
- Run the Function in a Local Container
- Deploy the HTTP Trigger Function Container to Azure
- Create a Local Queue-Triggered Azure Function
- Enhancing the Queue-Triggered Function
- Running the Queue-Triggered Function in a Local Docker Container
- Deploy the Queue-Triggered Function Container to Azure
PART 1: Create a Local HTTP Trigger-based Azure Function
First, we’ll create a simple HTTP trigger-based Azure Function. The only aspect of this step related to Linux containers is the --docker parameter in step #2 below. You can omit that parameter and use these steps to get started with an Azure Function you plan to deploy as a “normal” Azure Function app service (i.e. not a container).
Prerequisite: Install the Azure Function Core CLI Tools.
Starting from a PowerShell prompt in an empty directory:
- Run: func --version
This is the command for the Azure Function CLI tools. It should display something like: 3.0.2881 - Run: func init HttpTriggerFunction01 --worker-runtime dotnet --docker
This creates a new Azure Function project with the appropriate .csproj file and required Azure Function files. - Run: cd HttpTriggerFunction01
- Run: func new --name HttpTrigger --template "HTTP trigger"
This creates a new HTTP Trigger-based Azure Function. - Run: func start
This runs the function on the default port 7071. - Open http://localhost:7071/api/HttpTrigger in a browser to see the response from the function.
- Ctrl-C in PowerShell to stop the function app.
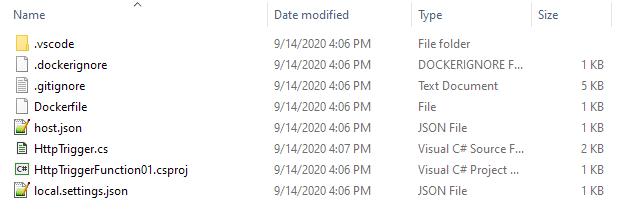
Prior to running the function, the new project and function look like this in Windows Explorer:
At this point you can also open the .csproj file in Visual Studio and run it under the debugger. It’s possible that the first time you do this, Visual Studio will display a “Downloading the Azure Function CLI Tools” dialog. Apparently, at least in some scenarios, VS uses a different installation of those tools than if you install them directly.
PART 2: Run the Function in a Local Container
Prerequisite: Have the latest version of Docker Desktop installed and running.
1. Run: docker info
Verify that it returns information about Docker to ensure that Docker Desktop is running.
2. Examine the generated Dockerfile:
FROM mcr.microsoft.com/dotnet/core/sdk:3.1 AS installer-env

COPY . /src/dotnet-function-app
RUN cd /src/dotnet-function-app && \
    mkdir -p /home/site/wwwroot && \
    dotnet publish *.csproj --output /home/site/wwwroot

# To enable ssh & remote debugging on app service change the base image to the one below
# FROM mcr.microsoft.com/azure-functions/dotnet:3.0-appservice
FROM mcr.microsoft.com/azure-functions/dotnet:3.0
ENV AzureWebJobsScriptRoot=/home/site/wwwroot \
    AzureFunctionsJobHost__Logging__Console__IsEnabled=true

COPY --from=installer-env ["/home/site/wwwroot", "/home/site/wwwroot"]
3. Run: ren .\Dockerfile .\Dockerfile.local
We’ll explain the reason for this a bit later. In short, this is to distinguish the Docker file used to build a local container from the Docker file used to build a container to be deployed in Azure. The only difference between them is in the environment variables added when the container is built.
4. Run: docker build --file .\Dockerfile.local --tag local/httptrigger01:v0.1.0 .
Note the ‘.' at the end of the command line. This command builds the local version of the container. The “local/” prefix of the image name is a convention to indicate that it’s not intended to be uploaded to Docker Hub.
5. Run: docker images
This will show the new image name, e.g.
local/httptrigger01 1.0 b2eb87ce6ac3 About a minute ago 484MB
6. Run: docker run -p:8080:80 local/httptrigger01:v0.1.0
This runs the container, mapping the port 8080 on the host (Windows) to port 80 in the container.
7. Open http://localhost:8080/api/HttpTrigger in a browser
At this point, you’ll get a 401 Unauthorized error, which we’ll explain below.
8. From another PowerShell prompt, run: docker ps
This lists the running images. Note the container ID, e.g. 1a82b3021578.
9. From that other PowerShell prompt, run: docker stop 1a82b3021578
This stops the container in the original PowerShell session. You’ll see the “job stopped” message at that prompt.
The reason you get a 401 Unauthorized error is because the trigger function created by the func new command has its AuthorizationLevel set to “Function”. The Azure Function Core CLI tools (i.e. func start) do not enforce that attribute - they are for local development and developer-level testing. The image upon which the local container is based does enforce that attribute, but as it’s not running within Azure, the key that’s required to include in the HTTP requests to allow the function to execute has not been created.
To fix this we’ll change the AuthorizationLevel to Anonymous.
1. Add the option “--configuration Debug” to the Dockerfile.local’s “dotnet publish” command
This ensures that it will use the “Debug” configuration of the project.
dotnet publish *.csproj --configuration Debug --output /home/site/wwwroot2. Ensure that the “DEBUG” constant symbol is enabled in the .csproj file.
<DefineConstants>DEBUG;TRACE</DefineConstants>3. Edit the HttpTrigger.cs file so that the AuthorizationLevel is “Anonymous” for Debug builds.
        [FunctionName("HttpTrigger")]
#if DEBUG
        public static async Task<IActionResult> Run(
            [HttpTrigger(AuthorizationLevel.Anonymous, "get", "post", Route = null)] HttpRequest req,
            ILogger log)
#else
        public static async Task<IActionResult> Run(
            [HttpTrigger(AuthorizationLevel.Function, "get", "post", Route = null)] HttpRequest req,
            ILogger log)
#endif
4. Re-run steps 3 through 8 above. The request in step 6 now succeeds.
PART 3: Deploy the Function Container To Azure
Next, we’ll build a container from the project and deploy the container to Azure.
Prerequisites: Have a Docker Hub account to which you can publish Docker images. Have the Azure CLI Tools installed.
1. Copy the Docker.local file to a Docker.azure file and change the configuration to “Release”
dotnet publish *.csproj --configuration Release --output /home/site/wwwroot2. Run: docker build --file .\Dockerfile.azure --tag adhalejrawh/httptrigger01:v0.1.0 .
This builds the image that we’ll deploy to Azure. The “adhalejrawh/” prefix of the image name is a convention indicating that the image will be pushed to that Docker Hub account.
3. Run: docker login
This ensures that you are logged in to Docker Hub. If you are logged in to Docker Hub within Docker Desktop, it will simply inform you that the login was successful.
4. Run: docker push adhalejrawh/httptrigger01:v0.1.0
This pushes the image to Docker Hub. When you create the the Azure function app service, you’ll tell Azure to use this image, which it will pull from Docker Hub.
5. Run the following commands to set some shell variables we’ll be re-using:
$resourceGroup="AwhLunchAndLearnRG"
$storageAccount=”awhlunchandlearnsa”
$functionPlan=”AwhLunchAndLearnAP”
$functionName=”AwhLunchAndLearnHttpTriggerFunction”
6. Run: az --version
Verify that the Azure CLI tools are installed and accessible.
7. Run: az login
Log in to your Azure account. This will likely take you to a browser window and give you a message when you’re logged in within the PowerShell session.
8. Run: az account set --subscription {subscription-guid}
Set your context for working with resources to the appropriate subscription.
9. Run: az group create --name $resourceGroup --location eastus2
Create a resource group for the Azure function.
10. Run: az storage account create --name $storageAccount --location eastus2 --resource-group $resourceGroup --sku Standard_LRS
Create a storage account. Will be used by Azure capabilities such as Application Insights. Can be used for storage queue-based Azure Function triggers.
11. Run: az functionapp plan create --resource-group $resourceGroup --name $functionPlan --location eastus2 --number-of-workers 1 --sku EP1 --is-linux
Create the function app service plan. This specifies how much in the way of hardware resources are available to the function.
12. Run: az functionapp create --name $functionName --storage-account $storageAccount --resource-group $resourceGroup --plan $functionPlan --deployment-container-image-name adhalejrawh/httptrigger01:v0.1.0 --functions-version 3
Create the function, telling Azure which image to deploy to it. You need to take note of a couple of pieces of information in the json result that this command displays:
- The “defaultHostName” value: azurewebsites.net
- The “id” value, something like: "/subscriptions/c602d2fa-790b-4721-93e8-4ab9315064e1/resourceGroups/AwhLunchAndLearnRG/providers/Microsoft.Web/sites/AwhLunchAndLearnHttpTriggerFunction"
13. Run: $storageConnectionString=az storage account show-connection-string --resource-group $resourceGroup --name $storageAccount --query connectionString --output tsv
Save the connection string to the storage account in a shell variable.
14. Run: az functionapp config appsettings set --name $functionName --resource-group $resourceGroup --settings AzureWebJobsStorage=$storageConnectionString
Set the connection string as a configuration (environment) variable for the function.
15. Go to https://awhlunchandlearnhttptriggerfunction.azurewebsites.net/api/HttpTrigger in a browser
Should get 401 Unauthorized because the AuthorizationLevel is Function, meaning a key needs to be passed to be able to invoke the function.
16. Run: az rest --method post --uri "/subscriptions/c602d2fa-790b-4721-93e8-4ab9315064e1/resourceGroups/AwhLunchAndLearnRG/providers/Microsoft.Web/sites/AwhLunchAndLearnHttpTriggerFunction/host/default/listKeys?api-version=2018-11-01" --query functionKeys.default --output tsv
Obtain the key for the function. It is a string of the form: sCyWIEH8hCyWBKVPcqNfXSudgy7K9k27nQw2WD3kMa5BWIS8Dwkixg==
- 17. Add the key to the URL as a query string parameter named “code”:
https://awhlunchandlearnhttptriggerfunction.azurewebsites.net/api/HttpTrigger?code=sCyWIEH8hCyWBKVPcqNfXSudgy7K9k27nQw2WD3kMa5BWIS8Dwkixg==
Now the function returns a 200 OK with the expected output.
PART 4: Create a Local Queue-Triggered Azure Function
Azure Functions may be “bound to” (or triggered by) a number of different technologies. HTTP triggers are the simplest trigger mechanism and are appropriate when the function needs to interact with some other back-end technology (e.g. a database) and return data to the application which invokes the function. Thus, an HTTP trigger function synchronous for the caller.
Often a function just needs to be given the required data and does not have to return anything to the application which needs the function to execute. In those cases it’s common to use an Azure Function which is triggered by a message in a queue.
Now we’ll create an Azure Function that is triggered by the arrival of a message in Azure Queue Storage.
We won’t go through details that we’ve already covered. We’ll focus on what’s different about queue-triggered Azure Functions.
Prerequisites: Install Azure Storage Emulator and Azure Storage Explorer.
1. From part 1, follow the general pattern to initialize a function project and a function:
- func init QueueTriggerFunction01 --worker-runtime dotnet --docker
- cd QueueTriggerFunction01
- func new --name QueueHandler --template queue
2. Start the Microsoft Azure Storage Emulator
3. Start the Microsoft Azure Storage Explorer
4. Run the function: func start
5. The default queue name in the function created in step 1c is “myqueue-items”:
- In Storage Explorer, navigate to Local & Attached ->Storage accounts -> Local Emulator -> Queues
- If it does not have a queue named “myqueue-items”, add one
- Add a message to that queue
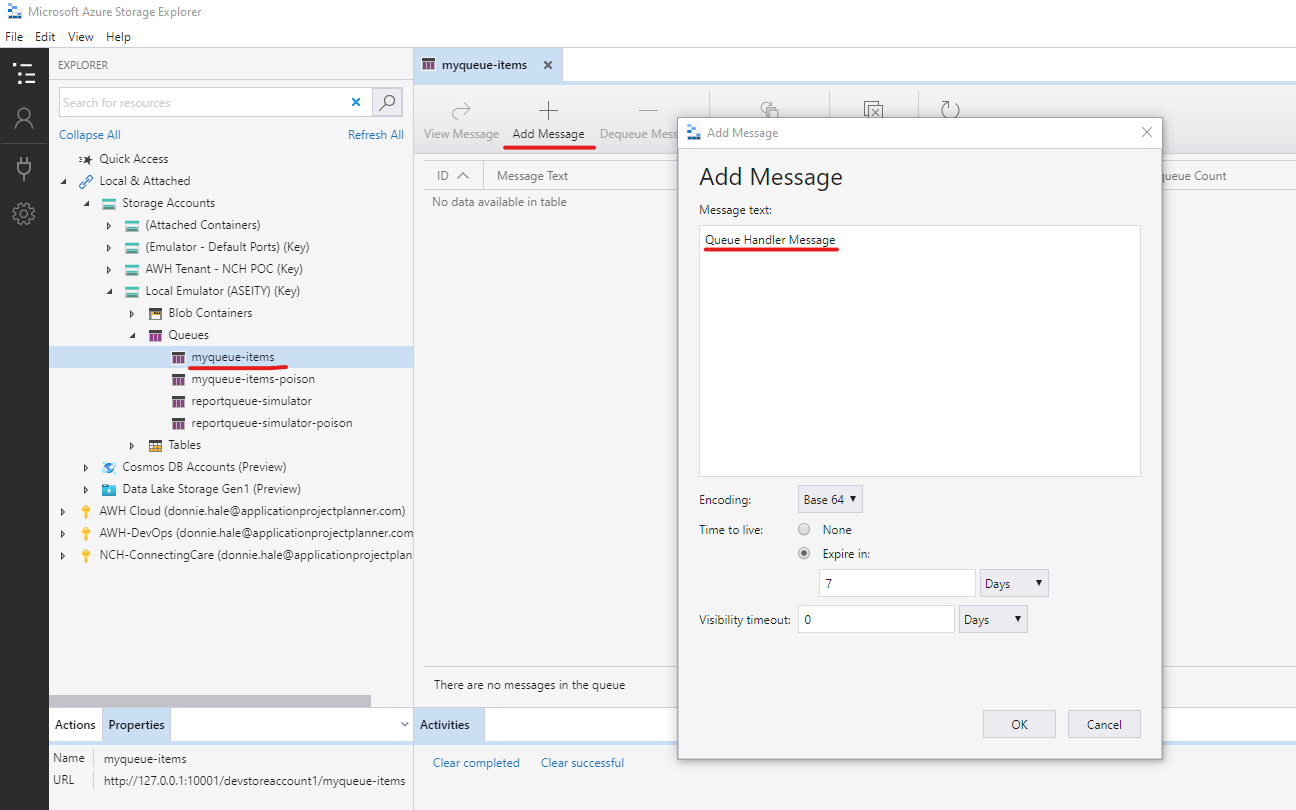
6. In the console window where the function is running, you will see the message echoed to the screen
C# Queue trigger function processed: Queue Handler Message
PART 5: Enhancing the Queue Function
In part 4 of this tutorial we created an Azure Function that is triggered by a message arriving in a storage queue. That function is a reasonable starting point, but it needs a few changes to serve as the foundation for a production-ready function:
- The connection string which tells the function which queue to monitor is a configuration parameter for the function, but the queue name is hard-coded. The queue name should also be a configuration parameter.
- The function should expect the queue message to be in json format which can be deserialized to a strongly-typed object.
Change the queue name to be a configuration parameter
The generated queue function looks like this:
    public static class QueueHandler
    {
        [FunctionName("QueueHandler")]
        public static void Run([QueueTrigger("myqueue-items", Connection = "")]string myQueueItem, ILogger log)
        {
            log.LogInformation($"C# Queue trigger function processed: {myQueueItem}");
        }
    }
Change it as follows:
    public static class QueueHandler
    {
        [FunctionName("QueueHandler")]
        public static void Run([QueueTrigger("%QueueName%", Connection = "AzureWebJobsStorage")]string myQueueItem, ILogger log)
        {
            log.LogInformation($"C# Queue trigger function processed: {myQueueItem}");
        }
    }
We’ve made the name of the parameter with the connection string explicit (AzureWebJobsStorage). We’ve also made the queue name a configuration parameter by placing '%' characters around the name (%QueueName%).
For this to work when the function is run locally, we also need to add that configuration parameter to local.settings.json, which acts as the Azure configuration parameters for the function when running locally.
{
    "IsEncrypted": false,
    "Values": {
      "AzureWebJobsStorage": "UseDevelopmentStorage=true",
      "QueueName": "local-queue",
      "FUNCTIONS_WORKER_RUNTIME": "dotnet"
    }
}
Accept the Message as JSON
Since the standard format of a queued message is likely json, create a simple queue message class:
    public class QueueMessage
    {
        public int MessageId { get; set; }
        public string MessageText { get; set; } = string.Empty;
    }
Deserialize the message from json to an instance of the QueueMessage class and log the message details:
using System.Text.Json;
//...
        [FunctionName("QueueHandler")]
        public static void Run([QueueTrigger("%QueueName%", Connection = "AzureWebJobsStorage")]string messageJson, ILogger log)
        {
            var message = JsonSerializer.Deserialize<QueueMessage>(messageJson);

            log.LogInformation($"Message ID: {message.MessageId}; Message Text: {message.MessageText}");
        }
Run the Function
1. As in part 4, run the function via: func start
2. In Storage Explorer, create the “local-queue” queue; and add a message to the queue:
{
  "MessageId": 2020,
  "MessageText": "What a year!"
}
3. The function will display the logged output:
Message ID: 2020; Message Text: What a year!
PART 6: Running the Queue-Triggered Function in a Local Docker Container
Accessing the Storage Emulator from the Local Docker Container
The local container can certainly be configured to reference an actual Azure storage queue: just set the AzureWebJobsStorage configuration variable in the container to the connection string for the Azure queue, as we’ll see in part 7. However, it’s more convenient when doing local development if all of the required tools and technologies are running locally. Perhaps you’re in a situation where your local PC can’t connect to Azure.
Since the function is running in a container and the storage emulator is running in the host operating system, the challenge is that by default the container can’t connect to the storage emulator to pick up messages from the queue. This can be overcome by proxying ports on the host that are accessible to the container to the ports on which the storage emulator listens.
Per the Azure Storage Emulator documentation, the emulator listens on the local 127.0.0.1 address, using port 10000 for blobs, 10001 for queues, and 10002 for tables. Docker leverages the Hyper-V virtual ethernet adapter to act as a switch providing connectivity between a container and the host. You can see this by running “ipconfig /all”:
Ethernet adapter vEthernet (Default Switch):

   Connection-specific DNS Suffix  . :
   Description . . . . . . . . . . . : Hyper-V Virtual Ethernet Adapter
   Physical Address. . . . . . . . . : 00-15-5D-24-7C-91
   DHCP Enabled. . . . . . . . . . . : No
   Autoconfiguration Enabled . . . . : Yes
   Link-local IPv6 Address . . . . . : fe80::1c60:6f1c:c405:ccf8%39(Preferred)
   IPv4 Address. . . . . . . . . . . : 172.31.160.1(Preferred)
   Subnet Mask . . . . . . . . . . . : 255.255.240.0
   Default Gateway . . . . . . . . . :
   DHCPv6 IAID . . . . . . . . . . . : 654316893
   DHCPv6 Client DUID. . . . . . . . : 00-01-00-01-26-65-CD-A4-0C-54-15-5B-B8-2D
   DNS Servers . . . . . . . . . . . : fec0:0:0:ffff::1%1
                                       fec0:0:0:ffff::2%1
                                       fec0:0:0:ffff::3%1
   NetBIOS over Tcpip. . . . . . . . : Enabled
To allow the container to connect to the storage emulator, we’ll proxy ports 40000, 40001, and 40002 (arbitrarily chosen) on the virtual switch’s IP address to the storage emulator’s ports (this must be done in at a command prompt with admin rights):
netsh interface portproxy add v4tov4 listenport=40000 listenaddress=172.31.160.1 connectaddress=127.0.0.1 connectport=10000 protocol=tcp
netsh interface portproxy add v4tov4 listenport=40001 listenaddress=172.31.160.1 connectaddress=127.0.0.1 connectport=10001 protocol=tcp
netsh interface portproxy add v4tov4 listenport=40002 listenaddress=172.31.160.1 connectaddress=127.0.0.1 connectport=10002 protocol=tcp
Verify the results by finding the listening endpoints using “netstat -an”:
  TCP    172.31.160.1:40000     0.0.0.0:0              LISTENING
  TCP    172.31.160.1:40001     0.0.0.0:0              LISTENING
  TCP    172.31.160.1:40002     0.0.0.0:0              LISTENING
Configure and Build the Local Docker Container
1. Rename the generated Dockerfile to Dockerfile.local
2. Edit Dockerfile.local to add additional environment variable settings:
FROM mcr.microsoft.com/dotnet/core/sdk:3.1 AS installer-env

COPY . /src/dotnet-function-app
RUN cd /src/dotnet-function-app && \
    mkdir -p /home/site/wwwroot && \
    dotnet publish *.csproj --output /home/site/wwwroot

# To enable ssh & remote debugging on app service change the base image to the one below
# FROM mcr.microsoft.com/azure-functions/dotnet:3.0-appservice
FROM mcr.microsoft.com/azure-functions/dotnet:3.0
ENV AzureWebJobsScriptRoot=/home/site/wwwroot \
    AzureFunctionsJobHost__Logging__Console__IsEnabled=true \
	AzureWebJobsStorage=DefaultEndpointsProtocol=http;AccountName=devstoreaccount1;AccountKey=Eby8vdM02xNOcqFlqUwJPLlmEtlCDXJ1OUzFT50uSRZ6IFsuFq2UVErCz4I6tq/K1SZFPTOtr/KBHBeksoGMGw==;BlobEndpoint=http://172.31.160.1:40000/devstoreaccount1;TableEndpoint=http://172.31.160.1:40002/devstoreaccount1;QueueEndpoint=http://172.31.160.1:40001/devstoreaccount1; \
	QueueName=local-container-queue

COPY --from=installer-env ["/home/site/wwwroot", "/home/site/wwwroot"]
3. Notice the AzureWebJobsStorage and QueueName environment variables. These take the place of the settings in the local.settings.json file when running via “func start” or within Visual Studio. The value used for AzureWebJobsStorage is the connection string format equivalent of the “UseDevelopmentStorage=true“ in local.settings.json. See the documentation for Azure Storage Emulator. You’ll notice, though, that the IP address and ports match those we proxied above, e.g. http://172.31.160.1:40001.
4. Following the procedure in part 2, build the container:
docker build --file .\Dockerfile.local --tag local/queuetrigger01:v0.1.0 .
5. Run the container: docker run -p:8080:80 local/queuetrigger01:v0.1.0
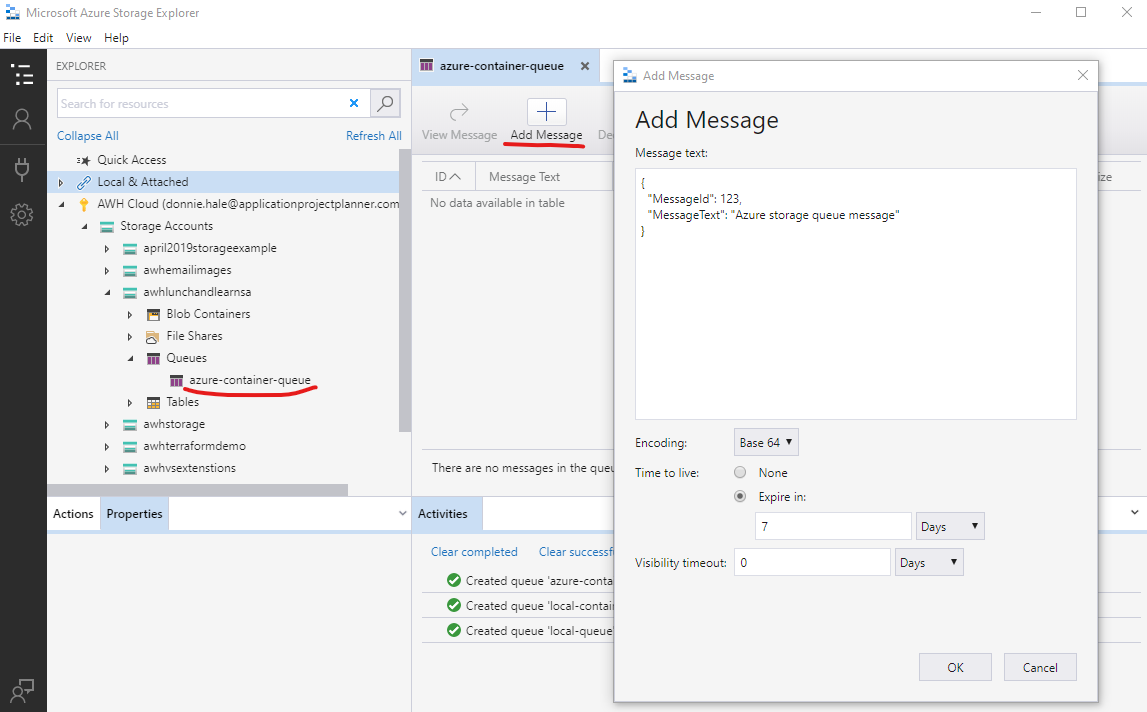
6. Using Azure Storage Explorer, post a message to a queue named “local-container-queue” in Azure Storage Emulator:
{
  "MessageId": 2021,
  "MessageText": "Please come!"
}
7. When the Azure Function running in the local container polls the queue, it will output the message content. The polling generally takes longer than when running the function via “func start” or Visual Studio:
Message ID: 2021; Message Text: Please come!
PART 7: Deploy the Queue-Triggered Function Container to Azure
These steps are very similar to the steps in part 3 when we deployed the HTTP trigger function to Azure.
- Copy the Docker.local file to Docker.azure
- Remove the AzureWebJobsStorage and QueueName environment settings from Docker.azure, and specify “Release” as the build configuration:
FROM mcr.microsoft.com/dotnet/core/sdk:3.1 AS installer-env

COPY . /src/dotnet-function-app
RUN cd /src/dotnet-function-app && \
    mkdir -p /home/site/wwwroot && \
    dotnet publish *.csproj --configuration Release --output /home/site/wwwroot

# To enable ssh & remote debugging on app service change the base image to the one below
# FROM mcr.microsoft.com/azure-functions/dotnet:3.0-appservice
FROM mcr.microsoft.com/azure-functions/dotnet:3.0
ENV AzureWebJobsScriptRoot=/home/site/wwwroot \
    AzureFunctionsJobHost__Logging__Console__IsEnabled=true

COPY --from=installer-env ["/home/site/wwwroot", "/home/site/wwwroot"]
The environment settings will be configured within the Azure Function app service. This allows the same exact container to be deployed to Dev, Test, UAT, and Prod environments.
3. Build the container: docker build --file .\Dockerfile.azure --tag adhalejrawh/queuetrigger01:v0.1.0 .
4. Ensure that you are logged into Docker Hub, logged into Azure, and that you are set to the correct subscription in Azure. (See part 3)
5. Push the container to Docker Hub: docker push adhalejrawh/queuetrigger01:v0.1.0
6. Ensure the shell variables from part 3 are set in your command shell, with $functionName set to “AwhLunchAndLearnQueueTriggerFunction”
7. Create the function: az functionapp create --name $functionName --storage-account $storageAccount --resource-group $resourceGroup --plan $functionPlan --deployment-container-image-name adhalejrawh/queuetrigger01:v0.1.0 --functions-version 3
Note that, unless the resource group, storage container, and app service plan from part 3 have been deleted, they still exist and can be applied to this function.
8. Get the connection string for the storage container: $storageConnectionString=az storage account show-connection-string --resource-group $resourceGroup --name $storageAccount --query connectionString --output tsv
9. Set the configuration setting for the connection string: az functionapp config appsettings set --name $functionName --resource-group $resourceGroup --settings AzureWebJobsStorage=$storageConnectionString
10. Set the configuration setting for the queue name: az functionapp config appsettings set --name $functionName --resource-group $resourceGroup --settings QueueName=azure-container-queue
Verifying the Queue-Triggered Function
At this point, the Azure Function exists and has the required configuration settings to connect to the storage account and monitor messages in the queue. Since this simple function produces no results which would verify that it is working, we can verify the function in two ways.
1. Using Azure Storage Explorer, put a message in the queue and see that it is picked up and does not get placed in the “poison” queue:
If the function is working correctly, within about 1 minute of adding the message, it will disappear from the queue (use “Refresh” on the queue in Storage Explorer).
The “poison” queue is a queue that Azure will create when a queue-triggered function exits with an unhandled exception. The poison queue’s name is the queue name suffixed with “-poison”. You can check if a poison queue has been created by refreshing the “Queues” in the storage container.
2. Monitor the Azure Function’s log stream from the Azure Portal:
Go to the Azure Portal for this subscription and select the Azure Function resource. Go to the “Log stream” blade on the right to monitor the function’s logs in real-time. Then put a message in the queue.
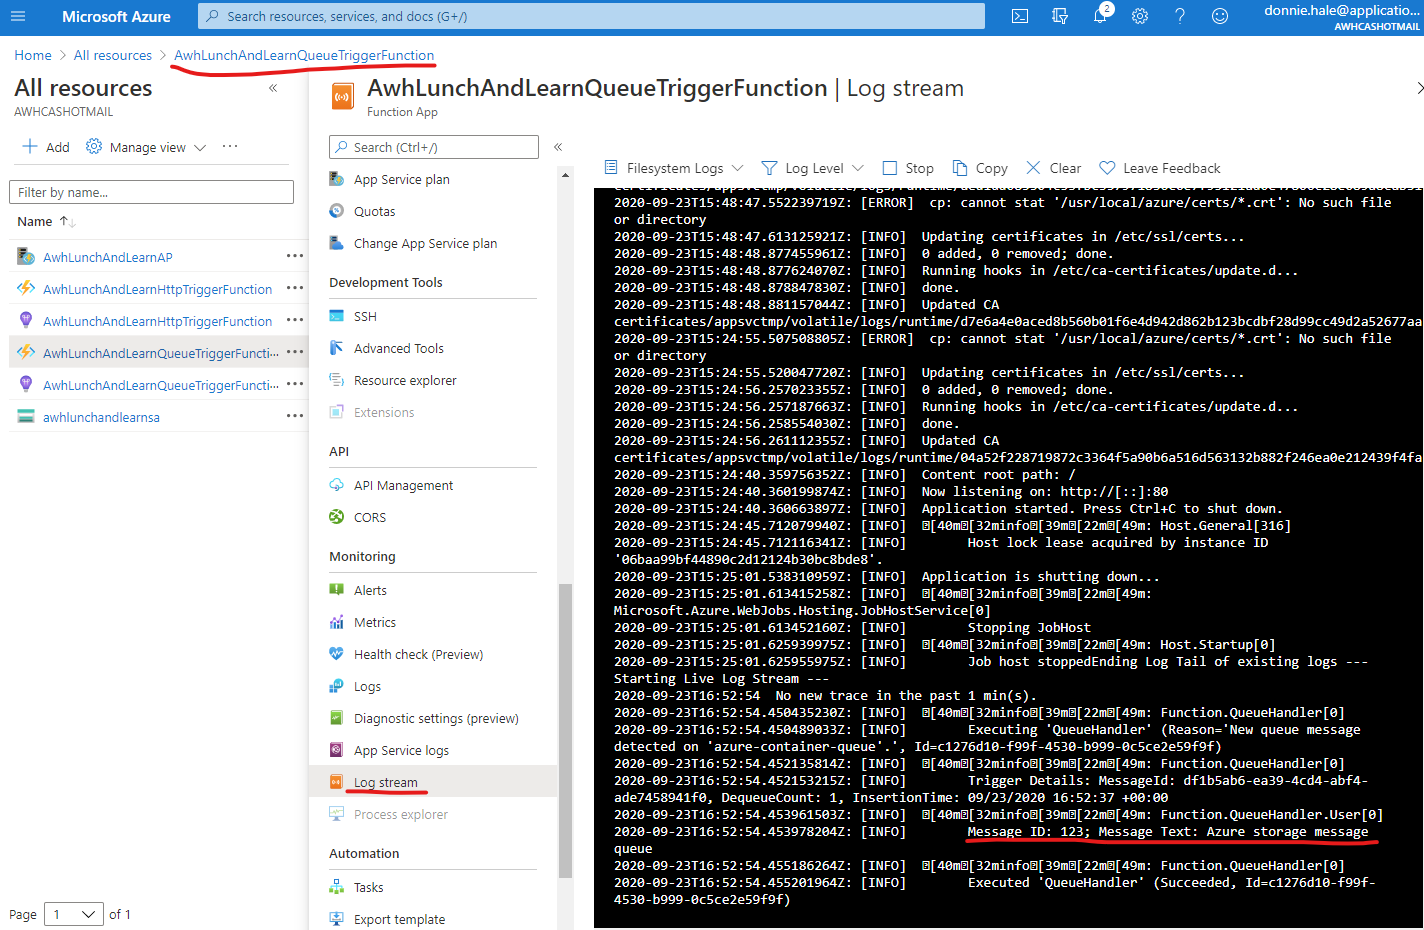
We can see the output of our function’s log message in the log stream.
Conclusion
In this tutorial, we’ve created an HTTP trigger Azure Function, run it locally, built and run a local Docker container with the function, and deployed and tested the function in Azure. We’ve also created a queue trigger Azure Function, run it locally using the Azure Storage Emulator, built and run the function in a local Docker container also monitoring the Azure Storage Emulator, and deployed and tested the function in Azure.
With this introduction to those techniques, you can begin implementing your application logic in an Azure Function.